General Purpose Utilities
Calendar: cal command
| Calendar: cal command |
| cal command is used to display the calendar. |
| Syntax |
| cal [options] [month] [year] |
| Examples |
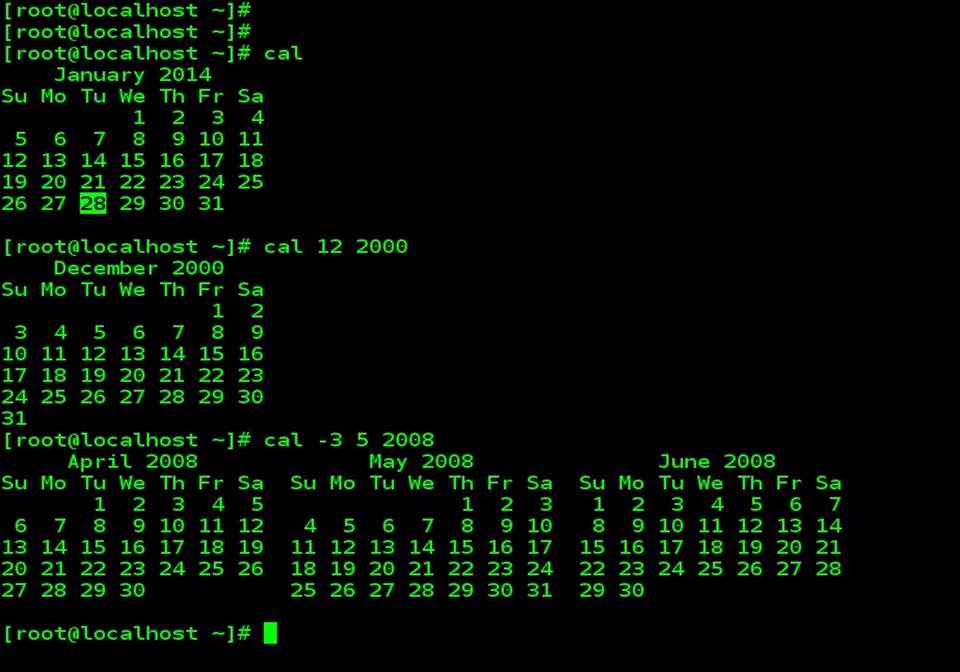
| cal |
| In general, if no options are given, cal displays the current month at the command line. |
| cal 12 2000 |
| Displays the calendar for December of the year 2000. |
| cal -3 5 2008 |
| Displays the calendar of April, May and June month of the year 2008. |
Calendar Examples
| Calendar other options | |
| OPTIONS | Meaning |
| -1 | Displays the single month as output. |
| -3 | Displays prev/current/next month output. |
| -s | Displays Sunday as the first day of the week. |
| -m | Displays Monday as the first day of the week. |
| -j | Displays Julian dates (days one-based, numbered from January 1). |
| -y | Displays a calendar for the current year. |
Displaying the System Date: date command format
| Date command format |
| You can display the current date with date command, which shows the date and time to the nearest second: |
| date |
| The date command can also be used with suitable format specifier as arguments. |
| You can print only the month using the format +%m |
| date +%m |
| Or month name |
| date +%h |
| Combining both the options. |
| date +”%h %m” |
| There are many other format specifiers, and useful ones are listed below : |
| d – The day of the month ( 1 to 31 ) |
| y – The last two digits of the year |
| H, M, and S – The hour, minute and second, respectively. |
| T – The time in the format hh:mm:ss |
| When you use multiple format specifier, you must enclose them within quotes ( single or double), and use a single + symbol before it. |
Date command examples

Echo Command
| echo command |
| echo – display a line of text |
| Syntax |
| echo [option(s)] [string(s)] |
| A string is any finite sequence of characters (i.e., letters, numerals, symbols and punctuation marks). |
| Usage |
| When used without any options or strings, echo returns a blank line on the display screen followed by the command prompt on the subsequent line. This is because pressing the ENTER key is a signal to the system to start a new line, and thus echo repeats this signal. |
| When one or more strings are provided as arguments, echo by default repeats those stings on the screen. Thus, for example, typing in the following and pressing the ENTER key would cause echo to repeat the phrase This is a pen. on the screen: |
| echo This is a pen. |
| Displaying the value of variable x |
| echo The number is $x. |
| echo, by default, follows any output with a newline character. This is a non-printing (i.e., invisible) character that represents the end of one line of text and the start of the next |
| The -e option is used to enable echo’s interpretation of additional instances of the newline character as well as the interpretation of other special characters, such as a horizontal tab, which is represented by \t. Thus, for example, the following would produce a formatted output: |
| echo -e “\n Projects: \n\n\tplan \n\tcode \n\ttest\n” |
| The -n option can be used to stop the echo from adding the newline to output. |
| By making use of output redirection, echo provides a very simple way of creating a new file that contains the text. This is accomplished by typing echo followed by the desired text, the output redirection operator (which is a rightward pointing angle bracket) and finally the name of the new file. |
| echo -e “\n Project1: \n\n\tplan \n\twrite \n\ttest\n” > project1 |
| echo can also be used with pattern matching, such as the wildcard character, which is represented by the star character. For example, the following would return the phrase. The gif files are followed by the names of all the .gif image files in the current directory: |
| echo -e The gif files are *.gif |
| echo is also commonly used to have a shell script display a message or instructions, such as Please enter Y or N in an interactive session with users. |
| echo is turned off automatically when passwords are entered so that they will not be shown on the screen. |
echo Examples

| echo options | |
| Option | Meaning |
| -n | do not output the trailing newline |
| -e | enable interpretation of the backslash-escaped characters listed below.
\NNN the character whose ASCII code is NNN (octal) \\ Backslash \a alert (BEL) \b Backspace \c suppress trailing newline \f form feed \n new line \r carriage return \t horizontal tab \v vertical tab |
| -E | disable interpretation of those sequences in STRINGs |
printf command: An alternative to echo
| printf : An alternative to echo |
| printf can be used instead of echo ( unless you have to maintain a lot of legacy code that use echo). |
| Usage |
| The printf command in its simplest form can be used in the same way as echo. |
| Examples |
| printf “NO Filename entered \n” |
| printf “My current shell is %s\n”, $SHELL |
| printf “The value of 255 is %o in octal and %x in hexadecimal\n” 255 255 |
printf Examples

| printf : options | |
| Options | Meaning |
| %s | String |
| %30s | As above but printed in a space 30 characters wide |
| %d | Decimal Integer |
| %6d | As above but printed in a space 6 characters wide. |
| %o | Octal Integer |
| %x | Hexadecimal integer |
| %f | Floating point number |
bc command: The calculator
| bc: The calculator |
| bc is a text-based calculator. When you invoke bc without arguments, the cursor keeps on blinking and nothing seems to happen. bc belongs to a family of commands ( called filters) that expects input from keyboard when used without an argument. Use [ctrl-d] to quit bc |

script command: Recording your session
| script: Recording your session |
| script command lets you record your login session in a file. You can later view the file. If you are doing some important work and wish to keep a log of all your activities, you should invoke this command immediately after you login : |
| script
Script started, the file is typescript |
| exit
Script done, the file is typescript |
| You can now view this file with the cat command. |
| script overwrites any previous typescript that may exist. If you want to append to it, or want to use a different log file, you can consider below arguments |
| Append to an existing file |
| script –a |
| Using a different log file |
| script logfile |
script command Examples

who command: who are the users?
| who command | |
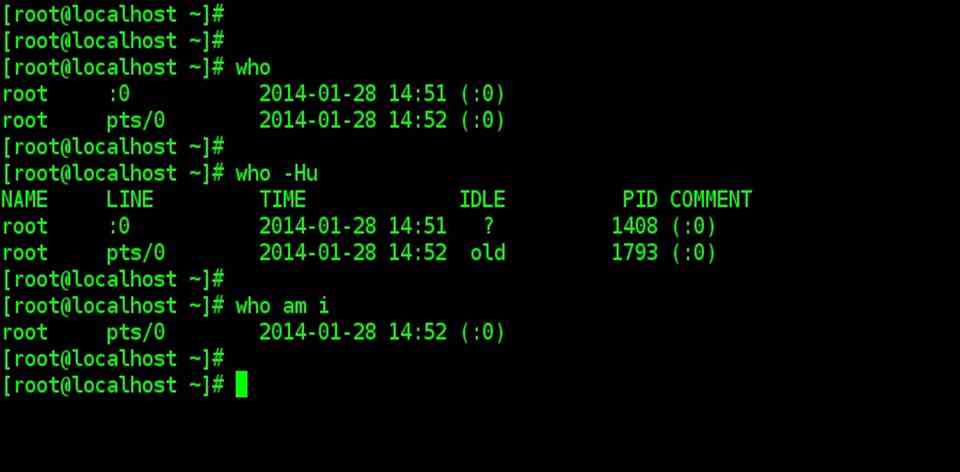
| Linux maintains an account of all users who are logged on to the system. It’s often a good idea to know their user-ids so you can mail them messages. | |
| who | |
| First column | Shows usernames (or user-ids) |
| Second column | The second column shows device names of their respective terminals |
| The third column, Fourth column & Fifth column | Shows the date and time of logging in. |
| Sixth column | Shows machine name from where the user logged in |
| who –Hu | |
| -H for header option –u for more detailed list | |
| who: who are the users ? |
| To know about yourself |
| who am i
|
uname command: Knowing your machine’s characteristics
| uname: Knowing your machine’s characteristics |
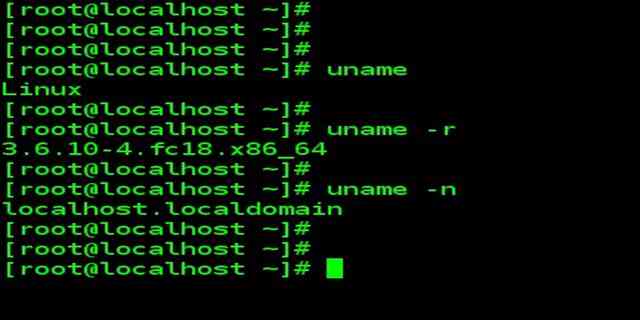
| The uname command displays certain features of the operating system running on your machine. |
| To simply display the name of operating system |
| uname |
| Use –r option to know the version of your operating system |
| uname -r |
| If your machine is connected to a network, it must have a name (called hostname). |
| uname –n |
The same output is obtained with hostname command
|
tty command: Know your Terminal
| tty : Know your Terminal |
| Since Unix/Linux treats even terminals as files, it’s reasonable to expect a command that tells you the filename of the terminal you are using. It’s the tty (teletype) command. This command is simple and need no arguments |
| tty
|

stty command: Display and Setting Terminal Characteristics
| stty: Display and Setting Terminal Characteristics |
| Different terminals have different characteristics, and your terminal may not behave in the way you expect it to. For instance, command interruption may not be possible with [ctrl-c] on your system. Sometimes you make like to change the settings to match the ones used at your previous place of work. |
| stty command both display and change settings. |
| To display all current settings |
| stty -a |
| Changing the settings using stty |
| We use below two options with stty command to change the settings
keyword=value keyword or –keyword. The – prefix option implies that the option is turned off. |
| To set the erase key as ‘k’ instead of backspace |
| stty erase k |
| stty: Display and Setting Terminal Characteristics |
| Entering a password through a shell script (echo) |
| The echo setting has to be manipulated to let shell programs accept a password-like string that must not be displayed on the screen. By default, the option is turned on, but you can turn it off in this way: |
| stty -echo |
| Changing the interrupt key (intr) |
| Default the interrupt key is set as [ctrl-c]. If you want to change it as [ctrl-h] |
| stty intr \^h |
| Changing the End-of-file key (eof) |
| Default end of file key is [ctrl-d]. If you want to change it as [ctrl-a] |
| stty intr \^a |
| When everything else fails (sane) |
| stty also provides another argument to set the terminal characteristics to values that will work on most terminals. Sometimes we need to switch to default settings. |
| To restore the original settings of the terminal. |
| stty sane |
stty command example

wc command: Counting Lines, Words & Characters
| wc: Counting Lines, Words & Characters |
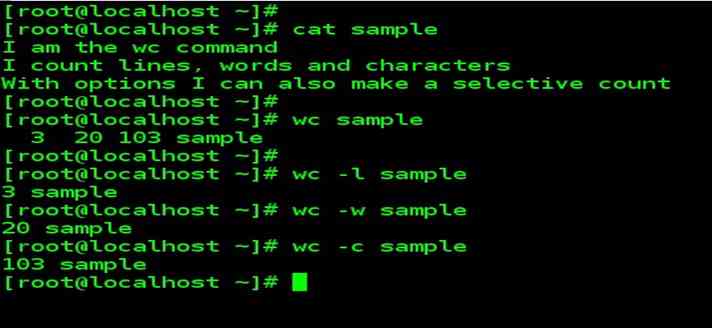
| wc is a word-counting program that counts lines, word and characters. It takes one or more filename as arguments and displays a four-columnar output. |
Consider a regular text file sample with the following contents :
|
| We can now use wc without options to make a “word count” of the data in the file : |
| wc sample |
| 3 20 103 sample |
| wc counts 3 lines, 20 words, and 103 characters. The filename has also been shown in the fourth column. The meaning of these terms should be clear as they are used throughout the book: |
| A line is a group of characters not containing a newline. |
| A word is a group of characters not containing a space, tab, and newline. |
| A character is the smallest unit of information and includes a space, tab, and newline. |
| wc : Counting Lines, Words & Characters |
| wc offers three options to make a specific count. The –l option counts only the number of lines, while the –w and –c options count words and characters, respectively: |
| wc –l sample |
| 3 sample |
| wc –w sample |
| 20 sample |
| wc –c sample |
| 103 sample |
| wc can also be used with multiple filenames. |
Compressing and Archiving files
gzip and gunzip command: Compress and decompress
| gzip and gunzip : Compress and decompress |
| gzip is used to compress any file. |
| Consider a regular text file sample.txt |
| wc –c sample.txt |
| 3875302 sample.txt |
| gzip sample.txt |
| wc –c sample.txt.gz |
| 788096 sample.txt.gz |
| To list how much file compression we actually achieve for both the files. Use the –l option with the compressed or original filenames as arguments : |
| gzip –l sample.txt.gz |
| Compressed uncompr. ratio uncompressed_name
788096 3875302 79.6% sample.txt |
| gzip and gunzip: Compress and decompress |
| Uncompressing a “gzipped” file (-d) . To restore the original and uncompressed file, you have two options: Use either gzip –d or gunzip with one or more filenames as arguments. The .gz extension is optional yet again: |
| gunzip sample.txt.gz
The above command decompress sample.txt.gz and retrieves the file as sample.txt |
| gzip –d sample.txt
The output of the above command is the same as previous. We don’t need to give .gz extension exclusively when –d option is used. |
| It can also be used with multiple files. |
| Recursive Compression (-r) |
| Like cp command, you can also descend a directory structure and compress all files found in subdirectories. You need the –r option, and the arguments to gzip must comprise at least one directory. Consider a directory named mydir |
| gzip –r mydir |
| Recursive decompression can be done by |
| gunzip –r mydir
or gzip –dr mydir |
| To view compressed text files, you really don’t need to decompress them. Use option
gunzip –c |
tar command: The Archival Program
| tar: The Archival Program |
| For creating a disk archive that contains a group of files or an entire directory structure, we need to use tar. In this section, we need to know how the command is used to create a disk archive. For this minimal use of tar we need to know these key options: |
| -c Create an archive
-x Extract files from archive -t Display files in the archive -f arch Specify the archive arc Only one of the above options can be used at a time. We’ll also learn to use gzip and gunzip to compress and decompress the archive created using tar. |
| Creating an archive (-c) |
| Consider 3 sample files : sample1 sample2 sample3 |
| To create an archive, we need to specify the name of the archive( using –f ), the copy or write operation ( -c ) and the filenames as arguments. Additionally, we’ll use the –v (verbose) option to display the progress while tar works. This is how we create a file archive, archive.tar, from the three uncompressed files sample1, sample2 & sample3 |
| tar –cvf archive.tar sample1 sample2 sample3 |
| Using gzip with tar |
| If the created archive is very big, you may like to compress it with gzip |
| tar: The Archival Program |
| gzip archive.tar |
| The above command creates a “tar-gzipped” file, archive.tar.gz. To use the files in this archive by user on other system user needs to have both tar and gzip at their end. |
| Extracting files from Archive ( -x ) |
| Tar uses the –x option to extract files from an archive. You can also use it right away on a .tar file, the one we just used to archive three directories. |
| But first, we have to decompress archive.tar.gz |
| gunzip archive.tar.gz
The above command will produce archive.tar Now we can extract the archive |
| tar –xvf archive.tar |
| The above command extracts all the file from archive.tar |
| Viewing the archive ( -t ) |
| To view the contents of the archive, use the –t ( table of contents) option. It doesn’t extract the file, but simply shows their attribute in a form that you’ll see more often later: |
| tar –tvf archive.tar |
zip and unzip command: Compressing & Archiving together
| zip and unzip: Compressing & Archiving together |
| Phil Katz’s popular PKZIP and PKUNZIP programs are available as zip and unzip on Unix & Linux systems. Zip combines the compression function of gzip with the archival function of tar. So instead of using two commands to compress a directory structure, you can only use one zip. |
| Zip requires the first argument to be the compressed filename, the remaining arguments are interpreted as files and directories to be compressed. The compression in the previous examples could have been archived with zip in the following way. |
| zip archive.zip sample1 sample2 sample3 |
| The unusual feature of this command is that it doesn’t overwrite an existing compressed file. If archive.zip exist, files will either be updated or appended to the archive depending on whether they already exist in the archive. |
| Recursive compression ( -r ) |
| For recursive behavior, zip uses the –r option. It descends the tree structure in the same way tar does except that it also compress files. |
| To compress your home directory |
| cd ~ ; zip –r myhomedir.zip |
| unzip |
| Using unzip: Files are restored with the unzip command, which in its simplest form, uses the compressed filename as an argument.
unzip does a non-interactive restoration if it doesn’t overwrite any existing files. |
| unzip archive.zip |
| Viewing the archive ( -v )
You can view the compressed archive with ( -v ) option. The list shows both the compressed and uncompressed size of each file in the archive along with the percentage of compression achieved. |
| unzip –v archive.zip |

