We can see JavaScript in action in different browsers. If we need to see the JavaScript action outside the browser? You need a runtime environment and here Node.js comes to the rescue. Node.js is a runtime environment that provides the environment to execute JavaScript’s execute in our local system without the need of a browser i.e. either in terminal or using an IDE environment.
In this post, we will learn how to install Nodejs and execute javascript in Jupyter Notebook by adding the functionality to Anaconda. This guide is applicable to Windows Operating Systems. To execute Javascript in Jupyter Notebook, you need to follow the below 7 steps in order.
Step 1: Install Visual Studio
There are different Visual Studio versions. You can install the latest version of Visual Studio Community Edition, it is a free version. Simply download and install by following the GUI instructions. The reason to install Visual Studio is to resolve dependency for npm. NPM is a “package manager” that makes installing Node “packages” fast and easy. Also, you need to include the “Desktop development with C++ Workload”. In the workload tab click on “Desktop development with C++ Workload” and on the right side in the section “Installation details” select all the packages” and click on “Install while downloading”.

Step 2: Install Anaconda
Anaconda installation is very easy you can simply follow the guide mentioned on the official link. You can select the Jupyter notebook at the time of configuring packages while installing Anaconda. In case you do not install it directly with Anaconda. You can install it using the Anaconda command prompt. Simply open the Anaconda Command Prompt from Windows Start Menu and type the below command to install Jupyter Notebook
conda install -c conda-forge notebook

Step 3: Installing Nodejs
Now, type the below command in the Anaconda Command prompt to install NodeJS.
conda install -c conda-forge nodejs

Once the nodejs is successfully installed you can simply check which version of nodejs is installed by typing the following command in the Anaconda Command prompt.
node --version

Step 4: Install or Update the latest version of npm
Simply type the below command to install or upgrade the latest version of npm using the Anaconda command prompt.
npm install -g npm@latest

Once the npm is successfully installed or updated you can simply check which version of npm is installed by typing the following command in the Anaconda Command prompt.
npm --version

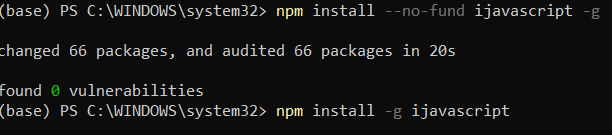
Step 5: Install ijavacript
Now, you are good to go and type the following command to install ijavascript using the Anaconda command prompt.
jupyter notebook
Step 6: Run ijsinstall on the command prompt.
To add the javascript(Node.js) functionality to Jupyter notebook execute the following command in the Anaconda command prompt.
ijsnstall

Step 7: Run Javascript demo code in Jupyter Notebook
- Simply open your Jupyter Notebook using Anaconda Navigator. Click on the Launch button to open the Jupyter Notebook.

- Now, you can click on the “New” button on the right side and select the “Javascript(Node.js)” option to create a new Javascript notebook using Jupyter.

- Run any demo or sample Javascript code in the notebook

Hurray! you have finally executed standalone javascript code in the Jupyter Notebook using Node.js runtime environment.

